
Greater design accuracy
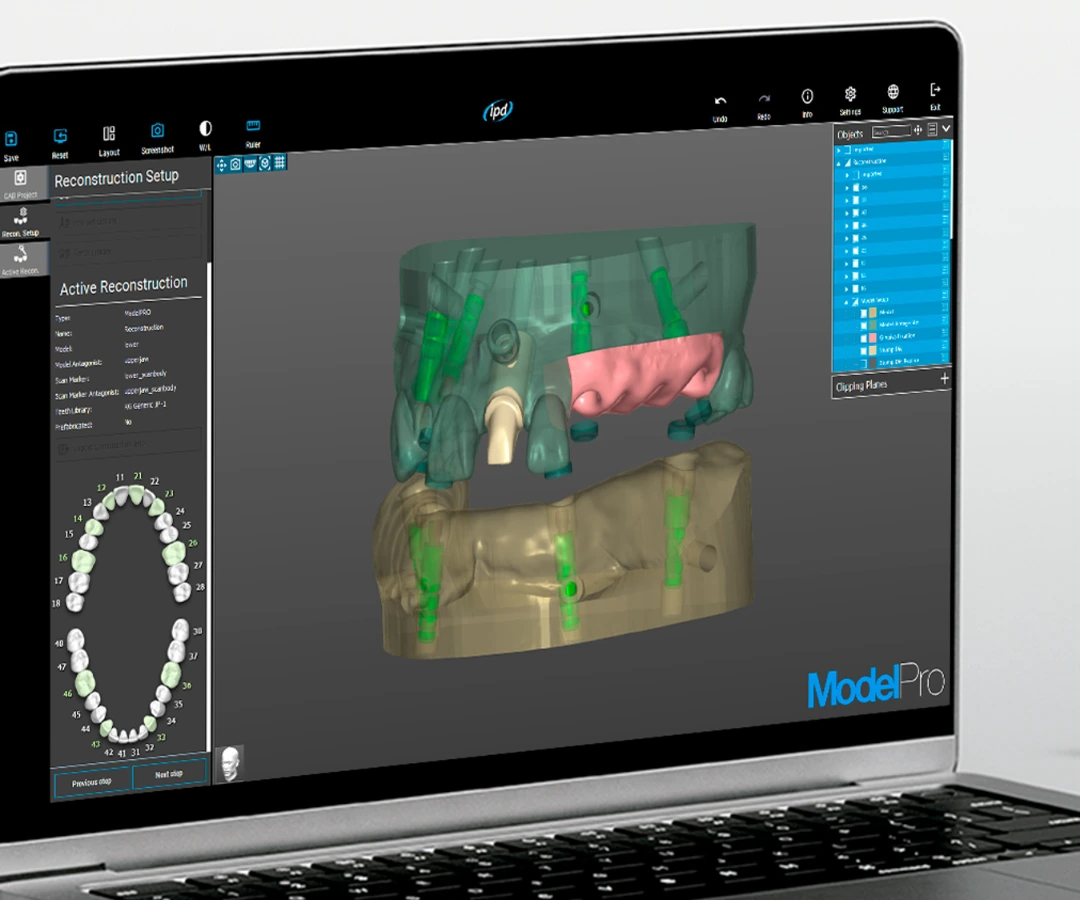
ModelPro helps improve prosthetic design accuracy by allowing STL files to be edited and prepared as a model for 3D printing.
ModelPro is IPD CAD software for creating 3D models, editing STL data and working within the digital implant workflow. It helps connect scan bodies, IPD libraries and digital analogs in one clear process.

The source materials are not presented as static images containing text. The key information has been rewritten and structured directly in HTML so that it is clear for users and readable by search engines.
ModelPro helps improve prosthetic design accuracy by allowing STL files to be edited and prepared as a model for 3D printing.
Scan Abutment Replace helps align the connection with the IPD digital workflow, simplifies STL export and import, and supports continuity between scan bodies and digital analogs.
Optimising the offset for IPD libraries helps reduce technical mismatches between CAD/CAM STL data and the printed model, particularly at digital-analog receptacles.
ModelPro connects with IPD digital components. The scan body captures the implant position, the library assigns the correct connection and the digital analog creates a stable reference point in the 3D-printed model.

The shared package is divided into libraries, installer, sample models and the user guide. For correct loading in ModelPro, we recommend leaving folder and subfolder names unchanged.
3-Modelpro/
├── 1-ModelPro Library/
│   ├── 1-ModelPro Abutment Library
│   └── 2-ModelPro Digital Analogs Library
├── 2-ModelPro Installer
├── 3-ModelPro Sample Models
└── User Guide
The workflow uses Osstem TSIII NP 3.5 as an example, but the logic is general: import scans, select the correct marker, align the library, insert the digital analog, verify the offset and export the model STL.
In CAD Project, use Import New Files and load the jaw STL as Upper Jaw or Lower Jaw. Import the separate STL containing the scan body as Upper Marker or Lower Marker.
At the import stage, it is important to distinguish the jaw, marker and any antagonist correctly.
In Reconstruction Setup, select Add Reconstruction, choose ModelPro as the type and mark only the implant positions involved in the case on the odontogram.
A cleanly configured reconstruction saves time when selecting libraries and checking analogs.
In Active Reconstruction, open Select Marker From Library and select the system, platform and exact scan-body reference. In the Osstem TSIII NP 3.5 example, distinguish IPD/OB-SN-00 for a crown and IPD/OB-SN-01 for bridgework.
1-ModelPro Abutment Library
└── Osstem TSIII
    └── NP 3.5
        ├── IPD/OB-SN-00
        └── IPD/OB-SN-01
The library must correspond to the scan body actually used.
During alignment, identify the top surface, lateral reference surfaces, rotational orientation and the overall outline of the scan body. If the library geometry does not overlap accurately, do not continue.
Accurate marker alignment determines how the software registers the prosthetic connection.
After registering the scan body, open 2-ModelPro Digital Analogs Library and select the digital analog for the same system and platform. Configure the analog receptacle according to the 3D printer, resin, printing accuracy and post-processing.
2-ModelPro Digital Analogs Library
└── implant system └── platform └── digital analog
With a new printer or resin, it is advisable to print a test model and verify the offset.
Once the connection and digital analog have been assigned correctly, set the base height, solid or hollow model, wall thickness, removable gingival mask and sectional inspection. The result is an STL ready for 3D-printer software.

The 3-Modelpro package keeps the libraries, installer, sample models and user guide together in one place.
The video section expands the ModelPro page with practical guides to the key steps: scan import, virtual articulator, removable die, gingival mask, Scan Abutment Replace, STL editing and model export for 3D printing.

The video shows verification of the 3D model together with the antagonist and occlusal relationships. It follows scan import, correct jaw orientation and STL preparation before 3D printing.
The preview shows the virtual articulator, antagonist and spatial verification of the model.
Open video in a new window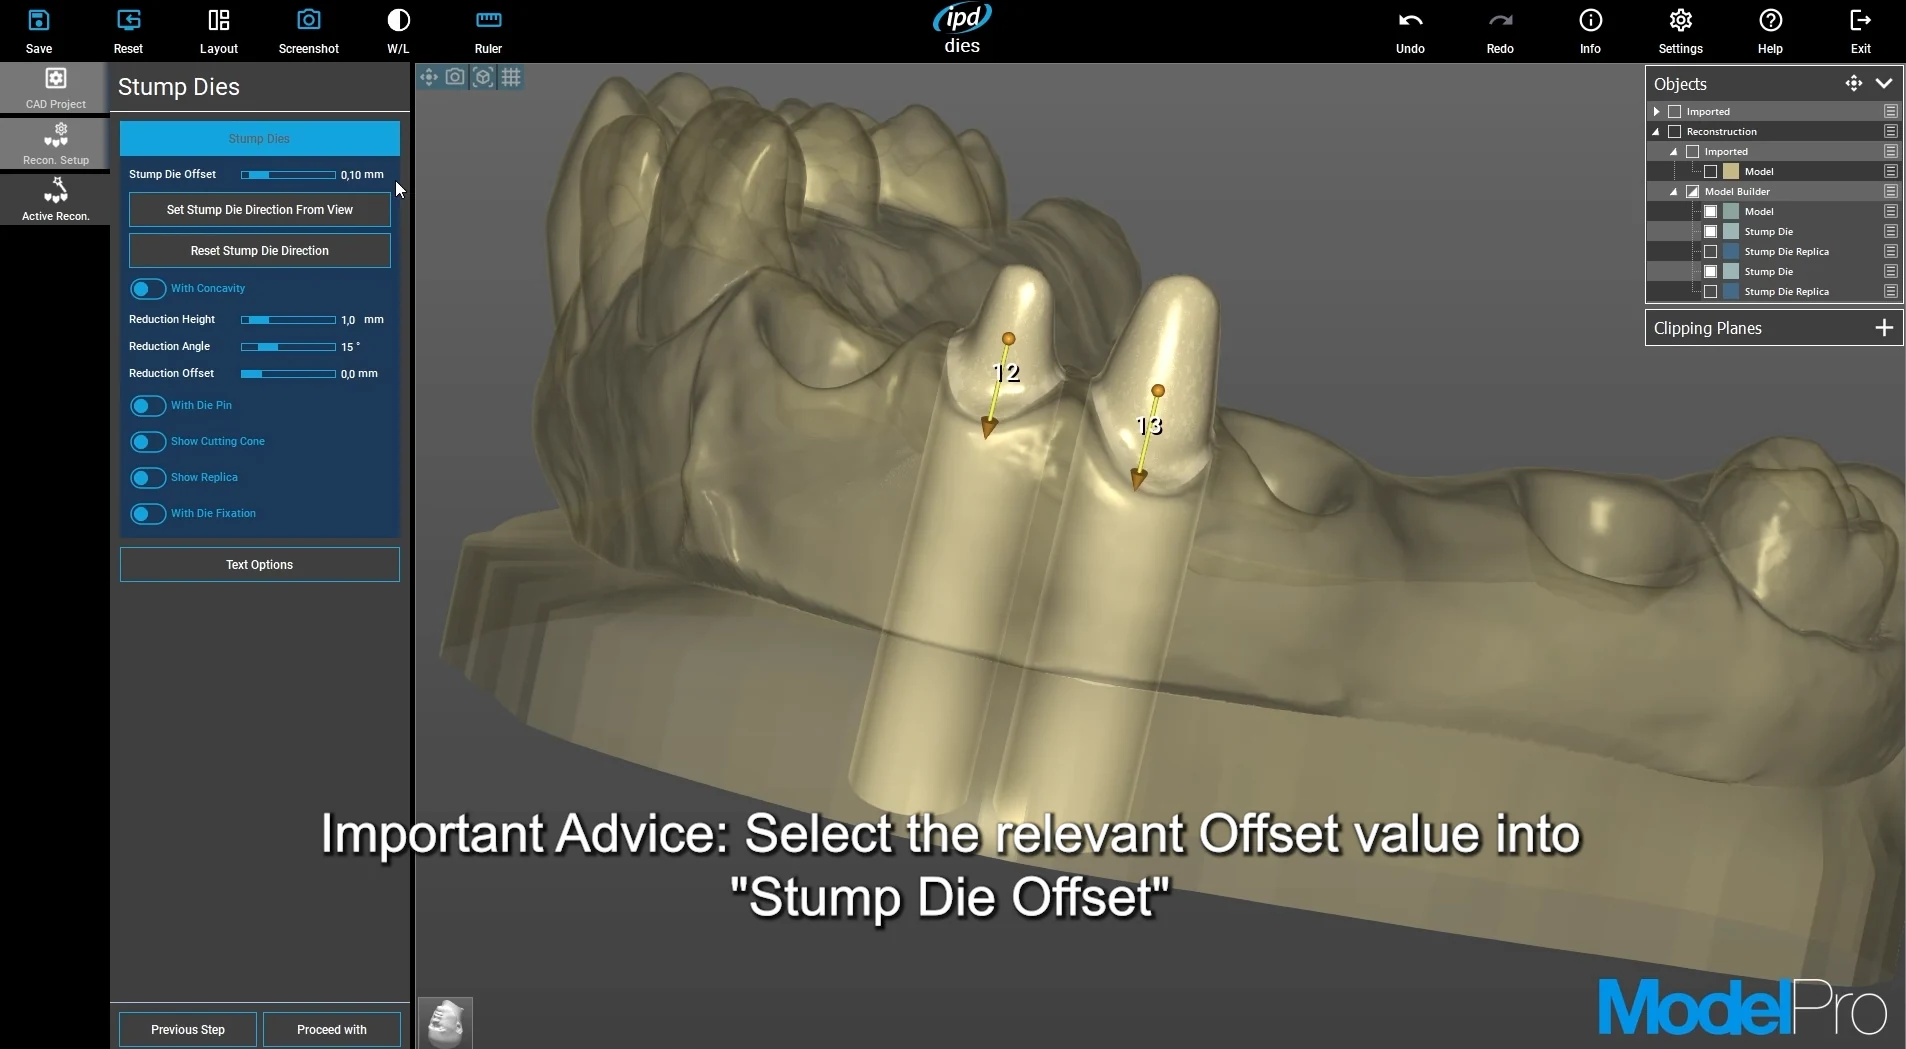
This practical Stump Die 3D video explains removable-die design, path of insertion and stability verification in the printed model.
The preview shows Stump Dies and offset settings for the removable die.
Open video in a new window
The video shows the design of a removable gingival mask around implants and digital analogs. It helps explain how to verify the emergence profile and the space around the soft tissues.
The preview shows editing and shaping of the gingival-mask segment.
Open video in a new window
The video covers adjustment of the model extent, margins and working area before final export. This is important for model stability and practical laboratory handling.
The preview shows Boundary Extension and verification of the model margin.
Open video in a new window
The video explains how to import the preparation margin from Exocad into ModelPro. This helps maintain continuity between prosthetic design, the preparation boundary and the resulting 3D model.
The preview shows automatic scanInfo saving and the link to Exocad data.
Open video in a new window
The video explains how to import STL files for the jaw, marker and, where applicable, antagonist. Correct assignment as Upper Jaw, Lower Jaw, Upper Marker or Lower Marker is fundamental to the entire workflow.
The preview shows orientation of imported STL scans using Manage Scans and Scan Orientering.
Open video in a new window
The video shows how scanned OEM or third-party scan-body geometry can be replaced with IPD geometry. The user can then continue within the IPD library, Ti-base, digital-analog and downstream 3D-model workflow.
The preview shows selection of the REPLACE folder in the implant library and replacement with IPD geometry.
Open video in a new window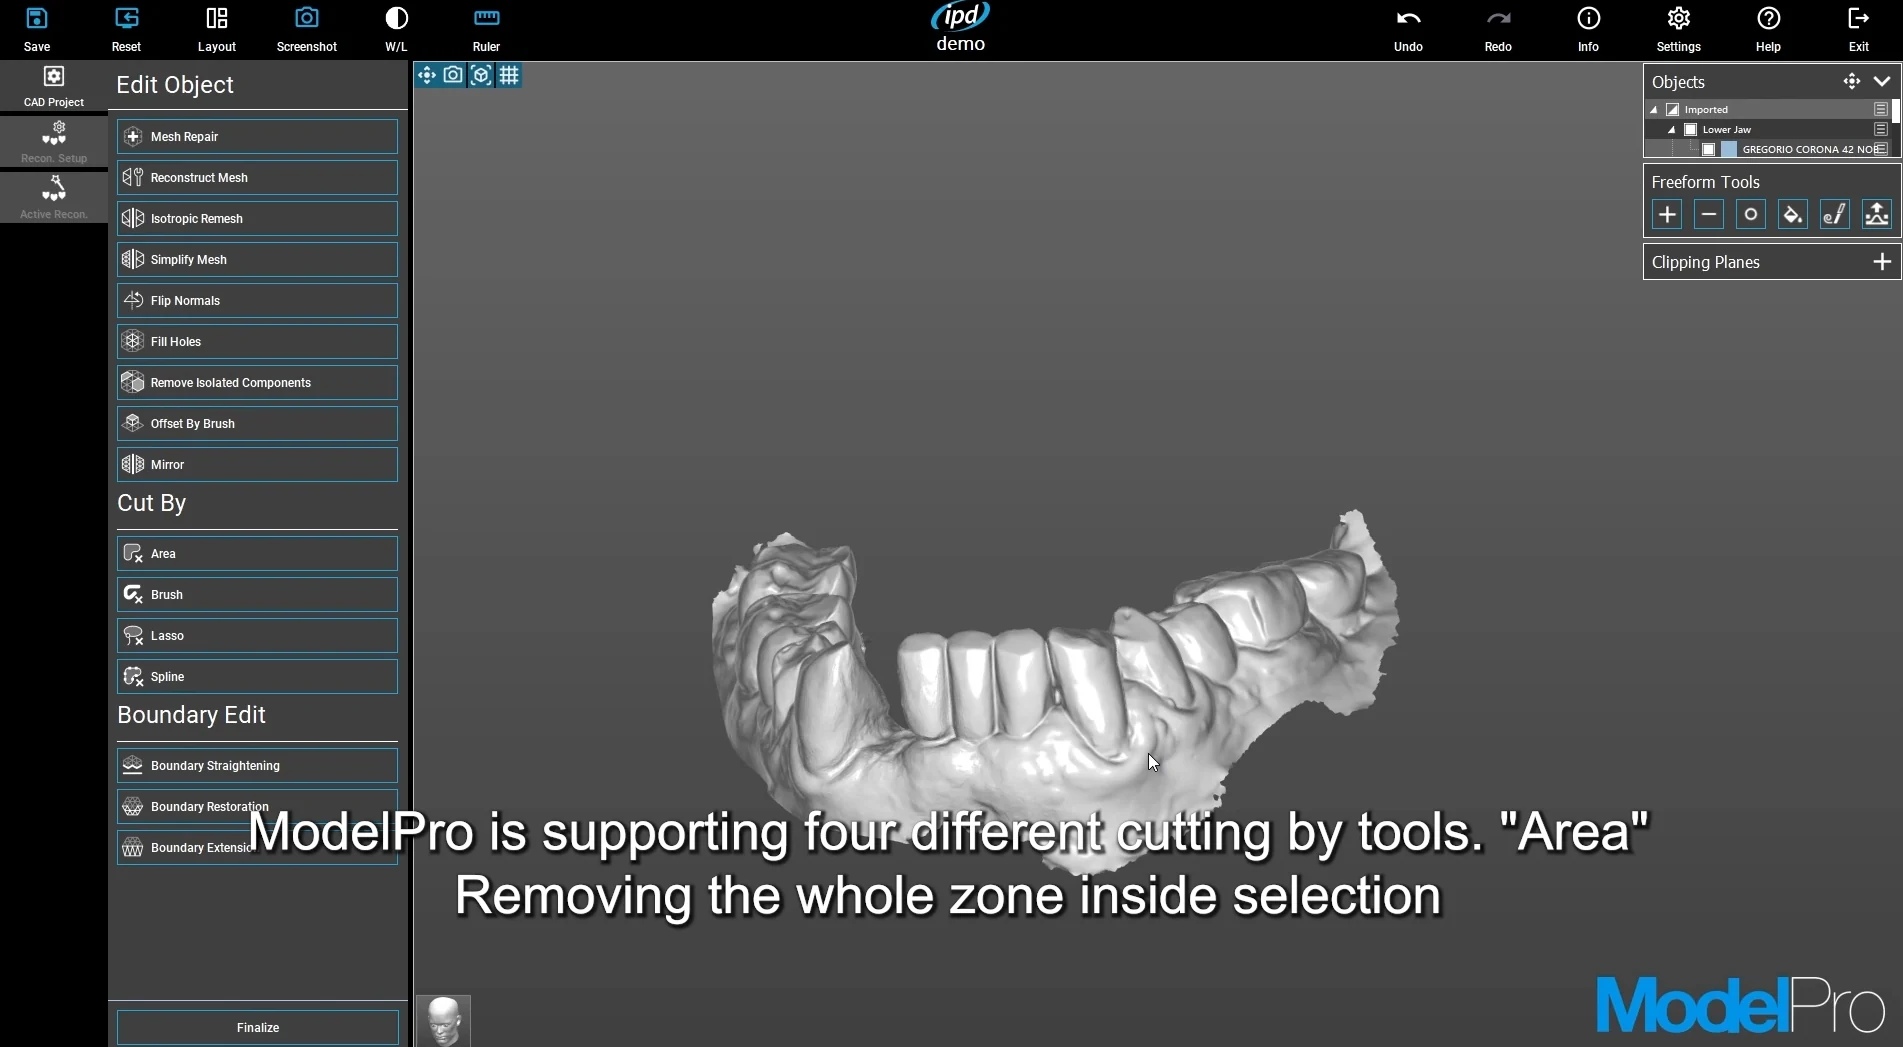
The video focuses on editing the STL model before printing: checking margins, base shape, hollow or solid model settings and practical adjustments for reliable manufacturing.
The preview shows Cut By, Boundary Edit and mesh-geometry editing tools.
Open video in a new window
The video closes the workflow by exporting the final STL file to the 3D-printer software. It summarises the final verification of the model, digital analogs and readiness for printing.
The preview shows selection of the relevant objects for export and preparation of the final STL.
Open video in a new window../images/model-pro/posterThe software itself is only one part. Model accuracy depends on the correct scan, correct library, correct digital analog and a verified 3D-printing process.
Implant-system names and third-party trademarks are shown solely to identify compatibility. Clinical and laboratory use must always follow the manufacturer's current instructions and professional assessment of the individual case.
Its primary function is the creation of 3D models, but ModelPro also provides additional tools such as Stump Die 3D, digital-analog workflows, gingival-mask design and Scan Abutment Replace.
Because the library defines the geometry used to align the marker. If a reference other than the one actually used for scanning is selected, the prosthetic connection may be registered inaccurately and the digital-analog receptacle may also be incorrect.
The digital analog must match the system and platform. After printing, it should seat stably, without free rotation or excessive insertion force.
Ideally, send a screenshot, the name of the selected library folder, the implant system and platform, and information about which scan body was physically used during scanning.

I am a dental professional within the meaning of Section 2a of Act No. 40/1995 Coll. on the Regulation of Advertising. I confirm that I am authorised to access pages intended for dental professionals.